Git
--local: 为每一个 repo 设立不同的 config。文件会被放在 .git/config 中,只对当前 repo 有效。--global: 设置为全局,对所有仓库生效。
设置用户:
git config --local user.name "Hugh Gao"
git config --local user.email "admin@luoxufeiyan.com"
Git 状态
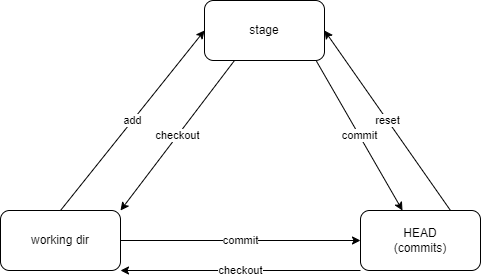
Git 的三个分区: working directory, stage area (index area), HEAD (commits).
- working directory 指的是文件夹中实际能看到的文件。
- stage 指的是通过
add命令添加进入的暂存区。 - HEAD 是当 stage 存在修改时,通过
commit命令添加进入的 Git 历史区,自此修改会被 Git 存档。HEAD 指的是 Git 的HEAD指针指向的位置。
working directory 与 stage 的改动可以通过 git status 命令查看, HEAD 的改动可以通过 git log 查看。
状态转移图:
ref: 我用四个命令概括了 Git 的所有套路 :: labuladong 的算法小抄
新建与克隆
Proxy 代理
为 git 设置代理,可以通过 git config 命令设置。 Git 支持多种代理,包括 http, https, socks4, socks5 等。
为全局设置 http 代理:
git config --global http.proxy http://127.0.0.1:8118
为单独仓库设置 socks 代理,需要先切换到仓库目录下:
git config --local http.proxy socks5h://127.0.0.1:1080
在克隆时使用代理,仅需在克隆命令后加 --config "http.proxy=socks5h://127.0.0.1:1080" 。 例如:
git clone https://chromium.googlesource.com/chromium/tools/depot_tools.git --config "http.proxy=socks5h://127.0.0.1:1080"
为特定的某个 remote 设置代理(以 GitHub 为例):
git config --global http.https://github.com.proxy "socks5://127.0.0.1:1080"
本地:
git config --global http.http://10.243.80.212.proxy "http://10.1.100.88:8118"
取消代理:
git config --local --unset http.proxy
在国内加速访问 GitHub 的方式可以参考:[2022.03] GitHub 加速终极教程
SSH 连接 Git
- 启用身份验证
ssh-agent bash
-
添加密钥
-
仅限当前会话:
ssh-add ~/.ssh/id_key -
持久化:(保存到 ssh 的配置文件中)
编辑
vim ~/.ssh/config文件,添加以下:
Host github.com
    User git
    IdentityFile ~/.ssh/GitHub/GitHub_id_rsa
- 测试
ssh -T git@github.com
添加远程仓库
git remote -v
git remote remove origin
git remote add origin git@github.com:user/repo.git
小抄速记
Cherry pick 从某一分支拉取特定的 commit 文件
合并所有 commit 可以用git merge,当只需要特定的 commit 时,可以用cherry pick。
用法:
git cherry-pick <commitHash>
撤销远程修改
即便 commit 已经推送到远程,依然可以用 revert 的方法将远程的提交删除。
撤销本地的最后一次 commit
git reset --hard HEAD~1
常用查询
查询仓库总代码量:
git ls-files | xargs wc -l | tail -n 1
查询最近一年的代码变化行数:
git log --since="1 year ago" --numstat | awk '/^[0-9]+/ { added += $1; deleted += $2 } END { printf("Added lines: %s\nDeleted lines: %s\n", added, deleted) }'
查询作者对仓库的修改行数:
git log --author="Hugh Gao" --pretty=tformat: --numstat | awk '{ add += $1; subs += $2 } END { printf "added lines: %s\nremoved lines: %s\ntotal lines: %s\n", add, subs, add - subs }'
查询一段时间内,各作者提交的行数:
git log --format='%aN' | sort -u | while read name; do echo -en "$name\t"; git log --author="$name" --pretty=tformat: --since =2018-02-08 --until=2024-03-08 --numstat | awk '{ add += $1; subs += $2; loc += $1 - $2 } END { printf "added lines: %s, removed lines: %s, total lines: %s\n", add, subs, loc }' -; done
查询某个分支上的提交数量:
git rev-list --count <branch-name>
Conventional Commits
git 常用编写
- feat: 添加新特性、新功能 (feature)
- fix: 修复 bug
- docs: 仅仅修改了文档
- style: 仅仅修改了空格、格式缩进、逗号等等,不改变代码逻辑
- refactor: 代码重构,没有加新功能或者修复 bug
- perf: 增加代码进行性能测试
- test: 增加测试用例
- chore: 改变构建流程、或者增加依赖库、工具等
Conventional Commits 的优点
- 自动生成变更日志。
- 自动确定不同功能版本升级(基于提交类型的)。
- 将更改的性质传达给协作成员。
- 触发构建和发布流程。
- 把仓库的提交历史变的更结构化。
相关工具:
- conventional-changelog/commitlint: 📓 Lint commit messages
- conventional-changelog/conventional-changelog: Generate changelogs and release notes from a project's commit messages and metadata.
GPG Sign
为 Git 提交添加 GPG 签名。
- 列出当前本机上的所有私钥。
gpg --list-secret-keys --keyid-format=long
结果如下:
/Users/hubot/.gnupg/secring.gpg
------------------------------------
sec   4096R/3AA5C34371567BD2 2016-03-10 [expires: 2017-03-10]
uid                          Hubot <hubot@example.com>
ssb   4096R/4BB6D45482678BE3 2016-03-10
- 选择提交所使用的密钥,如上的
3AA5C34371567BD2。
git config --global user.signingkey 3AA5C34371567BD2
- 设置提交时默认进行 commit 签名。
git config --global commit.gpgsign true
tips
如果你使用的某些 Git 客户端使用了 GitBash (例如 git-fork),且你使用了 GPG 程序(例如 GPG4Win 或者 Kleopatra)来管理密钥的话,GitBash 中的 gpg 路径可能未正确的指向 GPG 的程序,导致找不到密钥。
这种情况下,需要指向自定义的 GPG 程序。
git config --global gpg.program "/c/Program Files (x86)/GnuPG/bin/gpg.exe"
或者手动配置 gitconfig 文件:
[gpg]
    program = C:\\Program Files (x86)\\GnuPG\\bin\\gpg.exe
    format = openpgp
[commit]
    gpgsign = true
ref: https://gist.github.com/BoGnY/f9b1be6393234537c3e247f33e74094a
FAQ
解决因推送体积过大而失败的问题
推送时,出现以下问题:

Enumerating objects: 5979, done.
Counting objects:   0% (1/5979)
Counting objects:   1% (60/5979)
......
Writing objects:  99% (5920/5979), 25.83 MiB | 51.64 MiB/s
Writing objects: 100% (5979/5979), 25.83 MiB | 51.64 MiB/s
Writing objects: 100% (5979/5979), 41.36 MiB | 72.77 MiB/s, done.
Total 5979 (delta 3888), reused 5818 (delta 3799), pack-reused 0
fatal: the remote end hung up unexpectedly
Pushing to http://MyAddr/repo.git
Everything up-to-date
问题原因是当前 git 设置的 HTTP POST 包体长度过大。
解决方法:
git config http.postBuffer 524288000
ref: github - Git, fatal: The remote end hung up unexpectedly - Stack Overflow
如果修改了客户端的配置,问题仍然存在,且变成了 HTTP 413 ERROR,表示服务端的 HTTP Server 不支持过大的 POST 请求,一般是 HTTP Server + reverse proxy + git Server 的情况。
问题表现:
error: RPC failed; result=22, HTTP code = 413
fatal: The remote end hung up unexpectedly
fatal: The remote end hung up unexpectedly
需要修改 HTTP Server 的设置,把 POST 设置为一个较大的值。
ref: git - Github Push Error: RPC failed; result=22, HTTP code = 413 - Stack Overflow